Deploy OWASP Juice Shop On Heroku: Your Security Training Guide
Deploy OWASP Juice Shop on Heroku: Your Security Training Guide
Hey there, security enthusiasts and aspiring web hackers! Ever wanted a safe, hands-on environment to sharpen your web application security skills without the hassle of setting up complex servers? Well, you’re in luck, because today we’re going to walk through deploying OWASP Juice Shop on Heroku , turning your browser into a playground for ethical hacking. This isn’t just about getting an app online; it’s about setting up your personal training ground to truly understand web vulnerabilities. So, buckle up, guys, because this guide is designed to be super friendly, easy to follow, and packed with value to get you started on your web security journey.
Table of Contents
- Getting Started: Essential Prerequisites for Your Heroku Deployment
- Step-by-Step Guide: Deploying OWASP Juice Shop on Heroku
- Step 1: Clone the OWASP Juice Shop Repository
- Step 2: Navigate into the Application Directory
- Step 3: Create a New Heroku App
- Step 4: Push Your Code to Heroku
- Step 5: Configure Environment Variables (Optional but Recommended)
- Step 6: Open Your Application!
- Exploring Juice Shop: Your Hacking Playground on Heroku
- Troubleshooting Common Issues and Further Customization
First things first, let’s talk about what OWASP Juice Shop actually is. Imagine a fully functional, albeit intentionally insecure, e-commerce application. That’s Juice Shop! It’s the most modern and sophisticated insecure web application out there, meticulously designed by the Open Web Application Security Project (OWASP) to encompass a vast array of common web vulnerabilities. We’re talking about everything from Cross-Site Scripting (XSS), SQL Injection, and Broken Authentication, to Insecure Direct Object References (IDOR), sensitive data exposure, and much, much more. The beauty of Juice Shop is that it’s a learning platform – it presents challenges of varying difficulty, encouraging you to find and exploit these vulnerabilities, then track your progress on an in-app scoreboard. It’s an invaluable resource for developers looking to write more secure code, penetration testers honing their craft, or anyone curious about how web attacks actually work. It’s a place where you can experiment freely without causing any real-world damage, making it perfect for both beginners and seasoned pros looking to explore new attack vectors.
Now, why Heroku for this deployment? Heroku is a cloud platform as a service (PaaS) that makes deploying web applications incredibly simple. Think of it as your friendly neighborhood cloud server that handles all the complex infrastructure stuff for you. You just give it your code, and it takes care of running it, scaling it, and maintaining it. For our OWASP Juice Shop Heroku deployment , this means you don’t need to worry about configuring virtual machines, managing operating systems, or installing web servers. Heroku abstracts all that away, letting you focus entirely on the Juice Shop challenges. The free tier Heroku offers is a fantastic bonus, allowing you to host your Juice Shop instance without spending a dime, which is perfect for personal learning projects. It integrates seamlessly with Git, making deployments as simple as pushing your code. This combination of an easy-to-use platform and a powerful learning tool creates an ideal environment for anyone looking to dive deep into web application security. We’ll be walking through each step, making sure you feel confident and capable throughout the entire process. Get ready to have your own personal hacking range up and running in no time, providing you with a safe and legal way to practice and improve your cybersecurity skills. It’s truly an amazing resource for building practical experience in identifying and mitigating web vulnerabilities, all within a few simple commands. So, let’s get started and prepare our toolkit for this exciting adventure!
Getting Started: Essential Prerequisites for Your Heroku Deployment
Alright, team! Before we dive headfirst into the exciting part of deploying OWASP Juice Shop on Heroku , we need to make sure our workstation is properly equipped. Think of these as your essential tools for embarking on any modern web development or deployment journey. Getting these prerequisites sorted now will save us a ton of headaches later and ensure a smooth sailing experience. We’re aiming for a seamless OWASP Juice Shop Heroku deployment , and that starts with a solid foundation. These tools are pretty standard for anyone working with web applications and cloud platforms, so if you’re already familiar, feel free to skim, but it’s always good for a quick check. Let’s make sure we’re all on the same page and ready to rock and roll with our Heroku app setup .
First up, you’ll need a Heroku Account . This might sound obvious, but it’s the gateway to everything we’re about to do. Head over to heroku.com and sign up. They offer a generous free tier which is perfect for running a single instance of OWASP Juice Shop. The sign-up process is straightforward, requiring just an email and a few details. Once you’re signed up, you’ll have access to your personal Heroku dashboard, where you can manage your applications, databases, and other services. Having an account is non-negotiable, as it allows you to create and manage your Heroku applications directly from your terminal or through the web interface. Don’t worry, the free tier is more than sufficient for our security training purposes and will keep your Juice Shop running perfectly for you to practice your hacking skills.
Next, and perhaps the most crucial tool for interacting with Heroku from your local machine, is the
Heroku Command Line Interface (CLI)
. This powerful tool allows you to create apps, deploy code, manage add-ons, view logs, and much more, all without leaving your terminal. Installing it is quite simple, regardless of your operating system. For macOS users, a quick
brew install heroku/brew/heroku
usually does the trick. Windows users can download the standalone installer from Heroku’s dev center, and Linux users often find
snap install heroku --classic
or a package manager installation works well. If you have
npm
installed (which we’ll discuss next), you can also install it via
npm install -g heroku
. Once installed, you’ll need to
log in
by typing
heroku login
in your terminal, which will open a browser window for authentication. This establishes a secure connection between your local machine and your Heroku account, enabling all subsequent commands. The Heroku CLI is your best friend when it comes to managing your
OWASP Juice Shop Heroku app
, providing a robust interface for monitoring its health and performance.
Following that, we’ll need
Git
. For anyone involved in software development, Git is probably already a daily driver. It’s a
distributed version control system
that tracks changes in any set of computer files, usually used for coordinating work among programmers. In the context of Heroku, Git is not just for version control; it’s
the primary mechanism for deploying your code
. When you deploy to Heroku, you’re essentially pushing your Git repository to a special Heroku remote. If you don’t have Git installed, you can get it from
git-scm.com
or through your operating system’s package manager (
apt-get install git
on Debian/Ubuntu,
brew install git
on macOS). Once installed, make sure your basic Git configuration (username and email) is set up. This is absolutely fundamental for the
Heroku deployment process
as Heroku uses Git to receive and build your application’s source code. Without it, you simply can’t push your
OWASP Juice Shop
code to the cloud.
Finally, since
OWASP Juice Shop
is a Node.js application, you’ll need
Node.js and npm (Node Package Manager)
installed locally. While Heroku will handle installing Node.js and npm on its servers when it builds your application, having them locally is crucial for cloning the repository, installing local dependencies, and potentially running the application locally for testing or development before deploying. You can download the latest stable version of Node.js, which includes npm, from
nodejs.org
. It’s often recommended to use a version manager like
nvm (Node Version Manager)
, especially if you work with multiple Node.js projects requiring different versions. Nvm allows you to easily switch between Node.js versions, preventing conflicts. To check if they’re installed correctly, open your terminal and type
node -v
and
npm -v
. Seeing version numbers means you’re good to go! These tools are vital for preparing the
OWASP Juice Shop
codebase before it ever touches Heroku’s servers, ensuring all local scripts and package installations run smoothly.
With all these tools in place, guys, you’re perfectly set up to embark on your OWASP Juice Shop Heroku deployment journey. Each one plays a critical role in getting your insecure e-commerce app up and running in the cloud. Let’s move on to the actual deployment steps!
Step-by-Step Guide: Deploying OWASP Juice Shop on Heroku
Alright, fellas, now that we’ve got all our prerequisites sorted and our toolkit is gleaming, it’s time for the main event: deploying OWASP Juice Shop on Heroku ! This is where the magic happens, and you’ll see just how simple Heroku makes it to get a complex application like Juice Shop up and running in the cloud. We’re going to go through this step-by-step, making sure every command is clear and you understand exactly what’s happening. Your own personal web security training ground is just a few commands away, so let’s get down to business and make this Heroku app deployment a reality!
Step 1: Clone the OWASP Juice Shop Repository
The very first thing we need to do is get the OWASP Juice Shop source code onto our local machine. This code contains everything Heroku needs to build and run your application. Open up your terminal or command prompt and execute the following command:
git clone https://github.com/bkimminich/owasp-juice.shop.git
This command tells Git to download a copy of the official OWASP Juice Shop repository from GitHub to your current directory. You’ll see a bunch of files being downloaded, indicating that the cloning process is underway. Once it’s complete, you’ll have a new directory named
owasp-juice.shop
in your current location. This directory contains the entire application, ready to be prepared for
Heroku deployment
. Cloning is the initial critical step, ensuring you have the latest stable version of the application code that you’ll be pushing to the Heroku servers. It’s the foundation upon which your
OWASP Juice Shop Heroku app
will be built, so don’t skip this crucial initial fetch of the codebase.
Step 2: Navigate into the Application Directory
After cloning, you need to change your current directory in the terminal to the newly created
owasp-juice.shop
folder. This is important because all subsequent Git and Heroku commands need to be executed from within the application’s root directory.
cd owasp-juice.shop
Once inside, you’re now positioned correctly to interact with the Juice Shop project. You can even take a peek around using
ls
(on Linux/macOS) or
dir
(on Windows) to see the files and folders within. This step ensures that all your
Heroku CLI commands
and
Git operations
are performed on the correct codebase, preventing any mix-ups if you have other projects on your machine. This seemingly simple navigation is a critical part of the
Heroku deployment pipeline
, establishing the correct context for your application’s files.
Step 3: Create a New Heroku App
Now, let’s tell Heroku to prepare a space for our application. While still inside the
owasp-juice.shop
directory, run:
heroku create
What this command does is pretty neat: Heroku goes ahead and creates a
new application instance
for you in the cloud. It will generate a unique, random name for your app (like
polar-oasis-12345
), and most importantly, it sets up a
new Git remote
named
heroku
. This remote points to your new Heroku application. You’ll see output in your terminal confirming the app name and the Git remote URL. Keep this app name in mind, as you’ll use it if you need to reference your app in future Heroku commands. This single command is a powerful starting point for any
Heroku app setup
, bridging your local Git repository with Heroku’s cloud infrastructure. It’s truly the foundation of our
OWASP Juice Shop Heroku deployment
.
Step 4: Push Your Code to Heroku
This is the moment of truth! With the Heroku remote configured, you can now push your Juice Shop code to Heroku. Heroku will then take over, build your application, and deploy it.
git push heroku master
When you execute this, Git will push all the code from your local
master
(or
main
) branch to the
heroku
remote. Heroku will detect that it’s a Node.js application and will automatically use its Node.js buildpack. This buildpack does several things: it installs the correct Node.js runtime, runs
npm install
to get all the project dependencies, and then starts the application. You’ll see a lot of output in your terminal as Heroku goes through its build process – downloading dependencies, compiling assets, and finally launching your app. This can take a few minutes, so be patient. If there are any errors during the build, Heroku will inform you. A successful push means your
OWASP Juice Shop Heroku app
is being deployed! This command is the heart of the
Heroku deployment process
, transforming your local source code into a live, accessible web application on the internet. It leverages Heroku’s robust build system to automate the entire process, making it incredibly convenient for developers and learners alike.
Step 5: Configure Environment Variables (Optional but Recommended)
For a more robust
OWASP Juice Shop Heroku app
, you might want to set some environment variables. While Juice Shop generally runs well out-of-the-box, explicitly setting
NODE_ENV
to
production
can ensure it runs in an optimized mode and might suppress certain development-only features. You can do this using the Heroku CLI:
heroku config:set NODE_ENV=production
Environment variables are crucial for configuring applications in a cloud environment without hardcoding sensitive information. For Juice Shop, while less critical than for a typical production app, setting
NODE_ENV
helps ensure it runs as intended in a deployed context. You might also explore other
configuration variables
specific to Juice Shop if you delve deeper into its customization options. Heroku’s
config:set
command is a powerful way to manage application settings without modifying the code itself, offering flexibility and security for your
Heroku app setup
.
Step 6: Open Your Application!
Once the
git push heroku master
command finishes successfully, and you’ve potentially set your environment variables, your
OWASP Juice Shop Heroku app
should be live and accessible! To open it in your default web browser, simply run:
heroku open
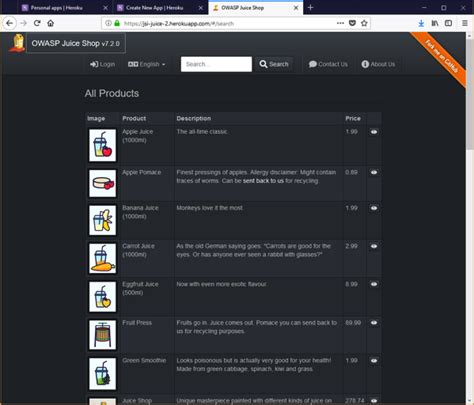
Voilà! Your browser will launch, and you’ll be greeted by the OWASP Juice Shop interface. You now have your very own instance of this insecure web application, ready for you to explore and exploit. Take a moment to celebrate, guys – you’ve successfully deployed a complex web application to the cloud with just a few simple commands! This marks the completion of the Heroku deployment and the beginning of your hands-on security learning journey. Now, let the hacking begin!
Exploring Juice Shop: Your Hacking Playground on Heroku
Alright, my fellow cybersecurity enthusiasts, congratulations! Your OWASP Juice Shop Heroku app is live, accessible, and shimmering in its intentional vulnerability. This isn’t just an e-commerce site; it’s your personal hacking playground, a safe and legal environment where you can freely experiment, exploit, and learn by doing . Now that the hard work of Heroku deployment is done, the real fun begins. Let’s dive into how you can make the most of this incredible resource, turning every click and every input into a valuable learning experience. Remember, the goal here isn’t just to break things, but to understand how they break and, more importantly, how to fix them .
First up, let’s talk about initial exploration . When you first open your OWASP Juice Shop Heroku app , take some time to simply browse around. Click on products, try to register an account (maybe even with intentionally weak credentials, just for fun!), log in, search for items, and add things to your cart. Pay close attention to the URLs, the request methods (GET, POST), and any input fields you encounter. This initial reconnaissance is crucial because it helps you build a mental map of the application’s functionality. Think like a curious user, but with a hacker’s mindset . Can you spot any unusual behavior? Are there any parameters in the URL that look like they could be manipulated? This preliminary interaction with your Heroku app will give you a baseline understanding of its normal operation before you start looking for vulnerabilities. Try to purchase an item, look at the profile page, or simply navigate through all the publicly available pages. This isn’t just about finding bugs; it’s about understanding the application’s architecture and how its different components interact, which is a key part of any penetration test.
One of the coolest features of OWASP Juice Shop, and absolutely central to your learning, is
The Scoreboard
. You can typically access it by navigating to
/#/score-board
in your browser’s address bar after your app URL (e.g.,
https://your-app-name.herokuapp.com/#/score-board
). The scoreboard is your
progress tracker
. As you successfully exploit vulnerabilities, challenges will be marked as solved, and you’ll see your score increase. Each challenge is described in a way that gives you a hint, but not the direct solution, pushing you to think critically and apply your knowledge. The scoreboard also provides a
powerful learning loop
: you attempt a challenge, if you succeed, you get validation; if you fail, you can research the vulnerability type and try again. It’s an incredibly motivating feature that keeps you engaged and provides clear milestones in your learning journey. Make it a habit to check the scoreboard regularly; it’s like a game, but instead of virtual points, you’re gaining
real-world security skills
that will boost your career prospects. This gamified approach to learning is what makes
OWASP Juice Shop
such a beloved tool in the cybersecurity community.
Now, let’s talk about the challenges themselves. OWASP Juice Shop covers an incredibly broad spectrum of web vulnerabilities. You’ll find challenges related to: Cross-Site Scripting (XSS) , where you’ll try to inject malicious scripts into the website; SQL Injection , where you’ll manipulate database queries to extract information or bypass authentication; Broken Authentication and Authorization flaws , where you’ll attempt to log in as other users or access unauthorized resources; Cross-Site Request Forgery (CSRF) , where you’ll trick users into performing unwanted actions; Insecure Direct Object References (IDOR) , where you’ll try to access resources by changing an ID in the URL; Missing Function Level Access Control , and much, much more. Each challenge is designed to teach you a specific vulnerability and how it can be exploited. Don’t be afraid to fail, guys! Failing is part of the learning process. Each failed attempt brings you closer to understanding the nuances of the vulnerability. The sheer variety of challenges means you’ll never get bored, and you’ll gain a holistic understanding of web application security. Your OWASP Juice Shop Heroku app is literally brimming with opportunities to learn and grow.
Finally, let’s touch upon resources for learning . While experimenting directly with your Heroku app is amazing, sometimes you might get stuck, and that’s perfectly normal! The OWASP Juice Shop project has fantastic documentation, including a cheatsheet and even a solution guide (use this only as a last resort, after you’ve genuinely struggled!). Additionally, the wider OWASP community and various web security blogs and tutorials are invaluable. When you encounter a challenge, research the specific vulnerability type. Understand its theory, common attack vectors, and how to identify it. Then, come back to your OWASP Juice Shop Heroku app and apply what you’ve learned. The process of researching, attempting, failing, learning, and succeeding is the core of mastering web security. Remember, the goal isn’t just to find the answer, but to internalize the concepts. Your OWASP Juice Shop Heroku deployment is more than just a deployed app; it’s a dynamic textbook for practical web security. Keep practicing, keep exploring, and you’ll be amazed at how quickly your skills will grow. Happy hacking, and always remember to hack ethically!
Troubleshooting Common Issues and Further Customization
Even with the smoothest Heroku deployment process, sometimes things don’t go exactly as planned. And that’s totally okay, guys! Encountering issues is a natural part of working with technology, and troubleshooting your Heroku app is a valuable skill in itself. Don’t get discouraged if your OWASP Juice Shop Heroku app isn’t behaving perfectly right away. We’re going to cover some common problems you might run into and how to tackle them, along with a few pointers for further customization, making sure your learning environment is as robust as possible. Remember, every problem solved is another lesson learned in the exciting world of DevOps and cybersecurity!
Let’s start with
common issues
during or after your
Heroku deployment
. One of the most frequent culprits is
build failures
. When you
git push heroku master
, Heroku attempts to build your application. If this process fails, you’ll see error messages in your terminal. The most powerful tool for diagnosing these issues is the
Heroku logs
. You can tail the logs in real-time or view past logs using the command:
heroku logs --tail
. Look for keywords like
